Tuesday, June 21, 2011

Mango Strawberry Lassi....a great chiller for a hot summer's day!

Our town annually holds a Strawberry festival in June where they celebrate...Strawberries.From Italian ices and strawberry shortcakes to fresh strawberries and even strawberry sodas,they had em all.It was a lot of fun walking around the festival while music played by local bands and singers filled the air.Our spirits were high and with that,my husband was inspired to buy himself a strawberry soda(which sadly they were out) and lots of fresh strawberries and I mean LOTS.So our refrigerator has been well stocked with them and it was time to use them before they went bad.Today was a hot day and so I thought why not make something cooling with the strawberries and not owning an ice cream maker,my options were limited.I had yogurt in the fridge,mangos in my fruit bowl and so I thought,lets blend them.Here's the recipe to a delicious fat free,sugar free Lassi that might be a great treat for the whole family.


Mango Strawberry Lassi


You'll need:


3 cups Fresh strawberries(sliced in half)
1 ripened Champaign mango (flesh scooped out)
2 cups Fat-free yogurt
3 tbsp Stevia or Agave to taste
1/2 cup Fat -free milk
Juice of 1 lemon
1 cup Ice cubes


Method:


Lassis are very easy to make.Combine all ingredients in your blender.Mix well and serve it while its still cold.You can keep it refrigerated if you're preparing it beforehand.Garnish with Strawberry slices or/and mango chunks.


Its as simple as that.A great drink for the summer and also to wow your friends and family.Not only is this a healthier recipe for a great drink but it is extremely flavorful.So try it out and let me know how it goes.

Note:For those of you who are lactose intolerant,you can substitute the yogurt and milk with soy products.


With love for food and you,
        Renu

Monday, June 20, 2011

Renu's Banchowal Cookies

As funky as its name is,this cookie that I came up with turned out super delicious.It has an interesting texture which I think works great.Have you ever wanted a cookie and a cake all in one?Here it is.It's got some crunch but is soft in the middle and the burst of flavors are divine.So give this recipe a shot and you'll know what I'm talking about.I almost forgot....Bachowal stands for Banana,chocolate chips and walnuts.

Renu's Bachowal Cookies


You'll need:


1 cup all-purpose flour
1/2 cup whole wheat flour
1 teaspoon kosher salt
1/2 teaspoon baking soda
1stick unsalted,low fat butter, at room temperature
1/2 cup stevia or 1/4 cup agave nectar (agave is very sweet so use according to preference)
1/3 cup light brown sugar, packed
1 large egg
1 1/2 teaspoons vanilla extract
2 ripe bananas, mashed
1 cup old fashioned rolled oats(optional)
1/4 cup dark chocolate chips
1/4 cup white chocolate chips
1/2 cup walnuts, toasted & coarsely chopped
Method:

Pre-heat oven to 375 degrees F. Prepare 2 cookie sheets with non-stick baking spray or parchment paper.
In a medium mixing bowl,add flours with baking soda ,sugars and salt.Mix well with a whisk.In a separate bowl using  a hand mixer or stand mixer,beat butter until creamy,add in egg and beat for an additional 30 seconds.Once egg and butter are mixed well,add in vanilla extract and mashed bananas.Beat for another 20 seconds.Add the wet ingredients to the dry ingredients and mix well.Once you have mixed the ingredients well (meaning no more dry flour at sight),fold in the chocolate chips and chopped walnuts.Incorporate all ingredients well.
Spoon about 1 tablespoon of batter onto your cookie sheet spacing each about 2 inches apart.I usually spoon about 3 per row and 12 cookies per sheet.Bake for about 15-20 minutes or until cookies are golden brown.Once cookies are done,let them sit for about 10 minutes before removing from the cookie sheet.Once cooled,plate and serve.Cookies can be kept in room temperature for about 2 days.You can also freeze them if you wish to keep them longer.

These cookies are healthy and a great treat for your family and friends.Its low in sugars and sodium and thats what you want in a cookie.Something you can eat and not feel guilty about it.Hope you have a successful try and let me know what you think about this recipe.I hope you enjoy them as much as we did.

With love for food and you,
        Renu

Saturday, June 4, 2011

Spicy Mango Chutney Turkey Wrap.......low cal and delish!

Today was such a gorgeous day that my husband suggested we went for a picnic at a park.This is a long overdue activity that we have been wanting to do and also it was time to use this really pretty wicker picnic basket that we've had for 5 years but never once used.I wanted an exciting lunch to take with me so I decided to whip up something with flavors I love yet low in calories.So,heres my recipe of a delicious wrap.


Spicy Mango Chutney Turkey Wrap


You'll need:

2 large multi grain Tortilla or wrap
1 Tomato(thinly sliced
 Boston lettuce(this happens to be my favorite but you can use any lettuce)
4-5 slices Deli smoked turkey 
Cheese slices(optional and cheese of your choice)

Spicy mango chutney sauce:

3 tbsp Light mayonaise(you can find a variety of low calorie mayos)
1/2 - 1 tbsp Sriracha chilli sauce (adjust to your spice preference)
1 1/2 tbsp Mango chutney (you can find them in jars at your local grocery store)
1/2 tsp Dijon mustard
Pinch of Salt
 1/3 tsp Black pepper (optional)


Method:
Add all the sauce ingredients in a small bowl and mix well into a thick spread.Set aside.Line tortilla with 2 pieces of lettuce followed by the turkey meat.Spread the sauce over the meat and top with sliced tomatoes and cheese.You can also use other toppings like sliced green peppers or avocados to go with your wrap.Fold the bottom of the tortilla upwards and roll the tortilla tightly,enclosing filling.Cut your wrap sideways in half if you wish.


I enjoyed my wrap and I'm not that big a fan of wraps in general.I just loved the combination of flavors especially the mango chutney with the turkey.It makes a great summer wrap.You can make it as spicy or not as you wish.Feel free to experiment with your favorite toppings.This sauce goes well for any sandwich.So,have a great wrap filled day and enjoy your summer.


With love for food and you,
   Renu

Satay Chicken and Shrimp Stir-Fry...My delicious little experiment.

I love making stir fries.They are delicious,easy to make and can be very nutritious depending on what you put into them.I have tried many sauces and ingredients to stir fry with and am always looking for exciting flavors to explore. One of my favorite places to eat at is the Cheesecake Factory and I always order this dish called the 'Bang-bang Chicken and Shrimp' which I adore.We recently went to one in West Hartford (nice to have one close enough) and they didn't have the coconut milk to make the dish,so I couldn't have it. Missing eating that dish,I decided to do something with a peanut sauce to compliment the Malaysian satay marinated chicken which I had leftover from our memorial day barbecue.So here's my little experiment which turned out to be a great dinner.


Satay Chicken and Shrimp Stir-Fry


You'll need:

1/2 lbs Easy peel shrimp
3-4  Boneless chicken breasts(cut into bite sized pieces)
3 Multi-colored bell peppers(cut into 2 inch pieces)
3 stalks Baby bok choy (or green leaf vege of your preference)
1 Onion (thinly sliced)
1/2 pack Baby Portobello mushroom(wiped and sliced)(you can also use canned mushrooms)
2 inch Fresh ginger (grated)
5 cloves Garlic (chopped finely)
2 stalk Scallion(chopped including white part)
1 1/2 tbsp Oil(heart healthy oils)

Sauce:


3 tbsp Natural peanut butter 
1 tbsp Light soy sauce
1 1/2 tsp Sriracha thai chili sauce or other chili sauces
1 tsp Chinese cooking rice vinegar
1 tbsp Agave nectar or stevia

Mix all sauce ingredients and set aside.


Method:


Heat oil in a wok and add in the garlic and ginger.Fry until fragrant.Be careful not to burn as this will render a bitter taste to the stir-fry.Add in the  onions immediately and fry until it turns a light brown.Add in the sauce and let it simmer for about 5 minutes.You can add water if it gets too dry.Once the sauce begins bubbling,add in the shrimp and stir in with the sauce.Let it cook for about 2 minutes and add in the chicken.Stir well to mix in the chicken with the sauce until cooked.Once chicken is cooked(when meat turns all white),add in the mushrooms and peppers.Let it cook for about 3 minutes before adding in the Bok choy.Stir everything together to make sure the sauce coats your ingredients well.Don't over cook the vegetables.Chinese stir fries are known for their crunchy and fresh vegetables.After about 3 minutes,add in the scallions and do a quick stir.Take stir fry off heat as sometimes electric stoves can keep cooking even after its been turned off.You can eat it as it is or serve with a side of rice or noodles.You can also garnish with some crushed peanuts if available.


Here it is....a great recipe for a simple stir fry that your friends and family might enjoy.You can show off your culinary skills with the simplest of meals.It doesn't always have to be a six course dinner to prove you can cook so give this a try and charm your loved ones with a delicious meal.Have fun trying it and remember that the smiles you put on the faces of the ones you serve is the best reward you can get and not to mention,the delicious burst of flavors for yourself doesn't hurt a single bit.So,enjoy this recipe and let me know how it goes.


Note:Many don't know that fresh mushrooms should not be washed.Washing them will only result in rubbery textured mushrooms.To clean them,use a wet kitchen towel or paper towel and wipe them down.Hope this tip helped you.


With love for food and you,
    Renu

Saturday, May 28, 2011

Sweet,Sour and Spicy Tofu....that you might just love.

Many people have reservations when it comes to eating tofu and for many reasons.Some don't like the texture,some can't stand the flavor and some just don't want to try it at all but I think it all comes down to how you prepare it. Tofu has always been a big part of my food world.It is used in many classic Chinese dishes and growing up in a very Chinese populated island,I was exposed to it from a very young age. From a side dish in a meal to dessert,I've had it all so I have never had a problem with it.Living in the US,I realized that many were not fans of tofu and one of whom is my husband.So, I got down to the whys of the dislikes not just with him but with others and found out,they have not been introduced to the best of tofu.
Now,here's a very bold recipe that I love and it also is a great compliment to my mung dhal dish that I would like you to try.

Sweet,Sour and Spicy Tofu

You'll need:

2 packs Very firm Tofu(cut into 1 1/2 inch cubes)
1/3 cup Tomato Ketchup
2 inches Ginger (sliced thinly)
1 Onion (sliced thinly)
2 tbsp Tumeric
1 tbsp Chili powder
Stevia and salt to taste
1 1/2 tbsp Oil

1/2 cup Oil(for frying Tofu)


Method:


In a frying pan or large skillet,heat 1/2 cup oil.In the mean time,sprinkle tofu cubes with some tumeric powder,enough to coat each side and 1/4 tsp of salt.Check oil by adding a small piece of tofu and it should sizzle. Add tofu,one at a time and allow some space in between each piece so not to stick together.You are surface frying with that amount of oil so make sure not to move the tofu until the edges are crusted and golden or else,tofu will stick to the pan.Fry each side till golden brown and let it sit on a plate lined with paper towel to absord access oil.You may need to fry up to 2 batches.Once,its all fried up,set aside.

In a small bowl,mix the tumeric powder and chili powder with enough water to make a thick paste.
 
In a seperate skillet(or you could use the same one.Just discard all but 1 1/2 tbsp oil),heat oil and add ginger.Fry till fragrant and add onions.Fry till light brown.Add in the paste and fry.Try not to make it too dry so feel free to add small amounts of water to avoid burning.Once bubbles start forming with the paste,add Tomato ketchup and salt.If the dish is too spicy,you may add the stevia or even honey to dum down the heat.Feel free to adjust the taste accordingly if you don't have a balance of the 3 flavors.This needs to be done before adding the tofu.Once you get the right taste (flavors can vary according to the ingredients you use),add on the tofu and mix well with the sauce.Let it simmer for about 10 minutes and turn off heat.


Another delicious dish ready to be served.By frying the tofu,you are taking away from the mushy typical tofu texture and actually give it a more chicken like texture.It's a great trick for your taste buds and mind if you have a problem with tofu.As for the flavors,the sauce has such great flavors that you won't even taste 'yucky tofu'.So,give it a try and its a great alternative to chicken if you are trying to cut down poultry.This is a great recipe to make as it is simple and doesn't require too many ingredient.

 As always,I'd love to hear some feedbacks so do give me some either here or by email.Hope to hear from you!


With love for food and you,
      Renu


Mung Dhal with Spinach....a delicious family dish.

This is one of my all time favorites in the family recipes.There are quite a few different versions of the same curry but this is my grandma's special which I learned from my mother.If I'm not wrong,all my mother's sisters(she has 5)prepare it this way and I love to have it with a few of my favorites like the sweet,sour and spicy tofu and Indian fried fish.Last week,I introduced that combo to my son and husband and much to my surprise,they enjoyed it very much.My son really wasn't the shocker as I've trained him from a young age to enjoy whats on his plate (sometimes with difficulties,might I add) but my husband who in his whole life,has not had fish actually loved the fried fish I made to go with the dhal.A very rewarding surprise.So on this post,I will be sharing with you the dhal recipe but keep an eye out for my posting of the great side dishes.Its a very Southern Indian meal.


 Mung Dhal 
Mung Dhal with Spinach


You'll need:

2 cups Mung Dhal (Soaked in water during prep)
8-10 cloves Garlic (whole)
2 inches Ginger (cut into slices)
2 tbsp Tumeric powder
1/2 tbsp Chili powder(optional if you like some spice)
1 tsp Asafoetida (also known as Hing..Optional)
3 cups Spinach (try using whole spinach.if too big,you can chop them)
2 tbsp Coconut milk(thick) or cream
Salt to taste


2 tbsp Ghee(Indian clarified butter) or vegetable oil
1/2 tbsp Black mustard seeds 
6-7 Curry leaves(if available)
3-4 Dried chilis
1/2 Onion or 5 shallots (cut into thin slices)


Method:


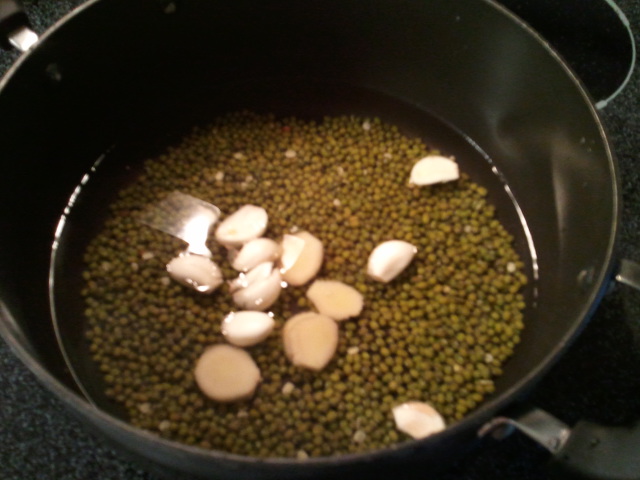
Initial boiling with whole garlic and ginger
 In a 5-Qt pot, add 4 cups of water and add mung dhal,garlic and ginger.Bring to a simmer and add tumeric,chili powder and asafoetida(if used).Let it come to a rolling boil and turn the stove down to  medium heat. Cover and let it simmer for about 15 minutes or until mung dhal is soft.Add water as needed as it can evaporate fast.Stir occasionally.Once the dhal is soft,add water filling about half your pot.Add in the spinach and stir.Cover and let it cook till the leaves are softened.This will take about 10 minutes. Add in the coconut milk and let it come to a boil before adding salt to taste.Turn off heat and set aside the pot.

 In a small skillet,heat ghee or oil and add mustard seeds,curry leaves and dried chilis and fry till fragrant.Once the mustard seeds start popping,add the onion slices or shallots and fry till light brown.Pour in the fried ingredients into the pot of dhal and stir to mix.Immediately,close the pot with a lid to infuse flavors. Serve with rice or chapati.

As we call it 'Pachaiperru dhal' all ready to be served
It's as simple as that.I know of a friend who loves to have it like soup and you could to but I've just been used to having this with rice so thats my recommendation.Asafoetida is traditionally added to dhal dishes to help with digestion.Any dhal can be a cause of stomach discomfort with gassiness so asafoetida is a herb that helps with that.So,if you can find it(Indian stores usually carry it),do use it even if you are making a simple lentil soup.It does not influence the flavor as much. It does have a strong smell when raw but when cooked,you won't smell it.The powdered form usually has a very mild smell to it so if you find it,that would be the best option for asafoetida as suppose to the whole form that you'll have to grate.

Well,have a great time trying it.Its super delicious and as you can tell from the ingredients,very nutritious.


With love for food and you,

      Renu

Tuesday, May 24, 2011

Chapati......healthy chapati!

Many people may not know that chapatis are low in calories as it is made with whole grain wheat flour also known as ' Atta' flour if you are ever go to an Indian grocery store.They are not your regular processed wheat flour.Atta flour actually has a rough texture unlike your regular flour which has a very smooth, powdery texture.They are not only a great bread to have with your curries,they are also very simple to make once you get the hang of it.Just like any other cooking,you'll need to keep trying till you get the techniques of making it down.
So here is the recipe and do let me know how it goes if you try it.


Chapati


You'll need:

2 cups Whole grain wheat flour
1 cups Warm milk (or in room temperature)
Salt to taste(optional)-add it to the milk,if used, to make the mixing easier.
2 tbsp cooking oil or smart balance buttery spread

1 clean kitchen towel or a piece of cloth big enough to wrap your chapatis in.
Rolling pin


Method:

In a medium bowl mix the flour with the warm milk using your clean hand.Add the milk in small amounts so you can get the right consistency for the dough.You want to make sure you get a soft dough but avoid making it too moist as this will give you a very sticky dough.If you do get too sticky a dough,add a little bit of flour to get a kneadable dough.Once its all mixed up,make a little well in the dough and add the cooking oil or butter to it.Continue kneading.
    The key to a soft chapati is in the kneading.I find that the more you knead,the smoother your dough becomes which results in soft chapatis.So go ahead and use this as a great stress release method.:)

 Knead for about 10-15 minutes the least and then wrap the dough in your kitchen towel or cloth and let it rest for about another 15 minutes.Once the dough is ready,divide it into equal portions and roll them roughly into the size of a golf ball.Make sure you roll them until you get a smooth,rounded ball to avoid cracking when you roll with your rolling pin.

     Once you are ready to roll them out into your chapatis,lightly spread some flour around your work surface and some on your rolling pin.Also,coat some flour on your ball of dough before rolling out to avoid sticking. Flatten the ball of dough on your work surface and begin rolling with the pin applying gentle pressure.You don't want to press down too much as this will make the dough stick.Constantly pick up your flattening dough and flip them as you add more flour as needed.Once you have a flat,round chapati the size of your liking,you are ready to cook them. Don't worry about making a perfectly round chapati.I don't always get a round one either.


Heat a flat bottomed pan on medium heat.I use a medium sized omelet pan.Add your chapati to the pan.You will start noticing little air bubbles surfacing on your chapati.I use a ghee(Indian clarified butter) coated paper towel or small piece of cloth to gently push down on the parts that look uncooked to help with the process.Make sure you don't burn the bottom.Little dark brown spots are ok.Once,the one side is cooked,flip over and do the other side.When it is done,wrap the cooked chapatis in the kitchen towel to maintain heat and softness till you are done with the rest.


There you have it.It looks like a lot but I was just elaborating at length to make sure I explain the process clearly as making chapatis can sometimes be tricky.Also,I used milk because it makes softer chapati than adding just water,which you could do,if you're lactose intolerant.So,give it a try and I hope you have a good experience with it.Don't hesitate to ask me any questions.I'm always here to help you get the best out of these recipes.Chapatis are best served with any Indian meat dishes or vegetarian dishes especially potatoes or dhal.Have fun!


With love for food and you,
        Renu